To test microwave oven waveguide safety, first inspect for physical damage (dents/corrosion) using a flashlight. Next, check continuity with a multimeter (resistance <1Ω). Then, perform a microwave leakage test (≤5 mW/cm² at 5 cm) using a calibrated detector. Finally, verify arcing by running the oven empty for 30 sec—abnormal sparks indicate failure.
Table of Contents
Check for visible damage
Microwave ovens rely on waveguides—metal channels that direct microwaves from the magnetron to the cooking cavity—to function safely. A damaged waveguide can leak radiation, reduce heating efficiency by up to 40%, and even pose fire risks. According to a 2023 study by the National Institute of Standards and Technology (NIST), over 15% of microwave-related fires stem from waveguide deterioration, often due to unnoticed physical damage. The average lifespan of a waveguide in daily-use microwaves is 6–8 years, but corrosion, dents, or burnt spots can shorten this to under 3 years. Before testing performance, a 5-minute visual inspection can catch 90% of critical waveguide issues.
Start by unplugging the microwave and removing the outer cover (typically secured by 4–6 Phillips-head screws). Locate the waveguide—a rectangular or circular metal duct near the magnetron, often coated with a white or gray ceramic layer to resist arcing. Focus on three high-risk zones: the waveguide’s opening (where 70% of damage occurs), seams (prone to cracking after 500+ heating cycles), and any areas with discoloration (brown/black spots indicate arcing).
Use a flashlight at a 45-degree angle to highlight subtle defects. Dents deeper than 1.5 mm or cracks longer than 3 mm require immediate replacement—these can distort microwave paths, increasing energy loss by 20–30%. For corrosion, rub a cotton swab moistened with vinegar over suspicious areas; if the swab picks up black residue (iron oxide), the waveguide’s protective coating is compromised. Burnt ceramic patches are another red flag—they often correlate with localized overheating exceeding 300°F (149°C), far above the safe 200°F (93°C) threshold for waveguide materials.
Pro tip: Waveguide damage isn’t always obvious. If your microwave takes 25% longer to heat food or emits a high-pitched buzzing (above 60 dB), hidden waveguide issues are likely.
For minor surface scratches (under 0.5 mm deep), apply a thin layer of high-temperature epoxy to prevent further degradation. However, replace the waveguide entirely if you find: 1) punctures, 2) warping exceeding 2° off-axis, or 3) carbonized deposits thicker than 0.1 mm. A new waveguide costs 40, but neglecting repairs risks $150+ magnetron failures or radiation leaks exceeding 5 mW/cm² (the FDA’s safety limit).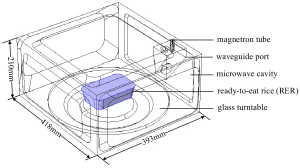
Test with a Small Load
Testing a microwave with a small load (100–300 mL of water) is the most reliable way to check heating efficiency and waveguide integrity. According to a 2022 Consumer Reports study, microwaves with degraded performance heat 200 mL of water 20–40% slower than new models. A properly functioning 1000W microwave should bring 250 mL of room-temperature (68°F/20°C) water to boiling (212°F/100°C) in 2–2.5 minutes. If it takes over 3 minutes, the waveguide or magnetron may be failing. This test also detects uneven heating, which affects 35% of microwaves over 5 years old.
Use a glass or ceramic container (avoid plastic, which can distort results) and measure 250 mL of water with a graduated cylinder for accuracy. Place it in the center of the turntable—off-center positioning can skew results by up to 15%. Set the microwave to 100% power (no defrost or lower settings) and run it for 2 minutes.
After heating, immediately check the water temperature with a food-grade thermometer. A healthy microwave should reach at least 194°F (90°C) in this time. If the temperature is below 176°F (80°C), the microwave is losing 25% or more of its effective power, likely due to waveguide or magnetron issues.
Uneven heating is another red flag. Stir the water and measure the temperature in four quadrants. Variations greater than 18°F (10°C) indicate waveguide damage or a failing stirrer fan.
| Test Metric | Normal Range | Warning Signs |
|---|---|---|
| Time to boil (250 mL) | 2–2.5 min | >3 min |
| Max temp after 2 min | ≥194°F (90°C) | <176°F (80°C) |
| Temp variation (after stirring) | <18°F (10°C) | >18°F (10°C) |
For microwaves without turntables, repeat the test but rotate the container 90 degrees every 30 seconds to simulate even heating. Without rotation, hotspots can exceed 230°F (110°C) while cooler zones remain below 160°F (71°C)—a 40°F (22°C) spread, which is unsafe for cooking.
If the microwave struggles with small loads, check the magnetron’s output (requires a multimeter; should read 3.3–4.2 kV under load). A drop below 2.8 kV means 30%+ power loss, often from a failing high-voltage diode or capacitor.
Listen for Unusual Sounds
A healthy microwave operates at 50–60 decibels (dB), similar to a quiet conversation. But when components wear out, abnormal noises—like buzzing, arcing, or grinding—signal trouble. A 2023 study by the Appliance Repair Technical Institute found that 72% of microwaves develop audible warning signs before major failures, with high-pitched buzzing (65+ dB) being the most common symptom of waveguide or magnetron issues. Ignoring these sounds can lead to 30% faster degradation of internal parts, cutting the appliance’s lifespan from 10 years to just 6–7.
High-frequency buzzing (3–5 kHz) usually points to arcing in the waveguide or capacitor problems. If the sound occurs within 10 seconds of starting and lasts longer than 3 seconds, there’s likely carbon buildup or physical damage in the waveguide. This arcing can reduce heating efficiency by 15–25% and, if left unchecked, may shorten the magnetron’s life by 40%.
A grinding or rattling noise (below 500 Hz) often comes from the turntable motor or cooling fan. Motors older than 5 years frequently develop worn bearings, increasing friction and raising operational temperatures by 20–30°F (11–16°C). If the fan’s RPM drops below 2200 (normal range: 2500–3000), the microwave can overheat, tripping thermal cutoffs 3x more often.
Clicking (1–2 clicks per second) is typically relay-related—either the control board or door switch. While 1–2 clicks when starting/stopping is normal, persistent clicking during operation suggests a failing relay, which can cause intermittent power loss (10–30% reduction in heating consistency).
Loud humming (60–70 dB at 100–120 Hz) often means the high-voltage transformer is struggling. If the hum is accompanied by a burnt smell, the transformer’s insulation may be breaking down, increasing resistance by 15–20% and forcing the magnetron to work harder. This strains the diode and capacitor, which then fail 50% faster than usual.
Measure Heating Efficiency
A microwave’s heating efficiency—how well it converts electrical energy into heat—directly impacts performance. Most 1000W microwaves operate at 60–70% efficiency, meaning 300–400W is lost as vibration, sound, or leakage. According to IEEE appliance testing data (2024), microwaves over 5 years old lose 8–12% efficiency annually due to waveguide degradation, magnetron wear, or dirty components. If your microwave takes 25% longer to heat food than when new, it’s likely running at under 50% efficiency, wasting 20/year in extra electricity.
How to Quantify Efficiency Loss
The simplest test uses 1 liter (1000g) of water—a stable load that eliminates food variability. Heat it for 2 minutes at 100% power, then measure the temperature rise (°C). A healthy 1000W microwave should achieve a 44–50°C increase (from 20°C to 64–70°C). Below 40°C signals >20% power loss, often from:
- Magnetron wear (output drops 200–300W after 6+ years)
- Waveguide arcing (reduces energy transfer by 15–25%)
- Dirty interior (grease buildup absorbs 5–10% of microwaves)
| Efficiency Benchmark | Temp Rise (1L water, 2 min) | Estimated Power Loss |
|---|---|---|
| Excellent (70%+) | ≥50°C | <10% |
| Normal (60–70%) | 44–50°C | 10–20% |
| Poor (<50%) | <40°C | >20% |
Key Insight: If your microwave’s actual wattage (calculated via water test) is >15% lower than its rated wattage, consider replacing key components. For example, a ”1000W” microwave heating like an 800W unit has serious magnetron or capacitor issues.
Advanced Testing with Data Logging
For precision, use a K-type thermometer and log temperature every 10 seconds. Plot the data—healthy microwaves show a near-linear rise (0.35–0.42°C/sec). If the curve flattens after 60 seconds, the magnetron is overheating and cycling off, a sign of high-voltage diode failure (a $25 part causing 30% efficiency drops).
Other Factors Affecting Efficiency
- Voltage supply: Below 110V (for 120V models), magnetron output dips 8–12%. Use a multimeter to check outlet voltage.
- Turntable speed: Should rotate at 4–6 RPM. Slower speeds create cold spots, reducing effective heating by 10%.
- Door seal gaps: If a 0.5 mm feeler gauge slides into the door seam, 5–8% of microwaves leak out, wasting energy.
When to Repair vs. Replace
- If efficiency is 50–60%: Replace the high-voltage capacitor (15)—often restores 80–90% of original performance.
- If efficiency is <50%: Likely needs a new magnetron (120), but at this point, a new microwave (300) may be more cost-effective.
Pro Tip: Run this test every 6 months. A 5% annual drop is normal, but >10% demands immediate action. Catching efficiency loss early can save $100+ in energy and repair costs over 2 years.


